如何在React JS中使用Prime React / Prime Faces创建进度条和进度旋转器
PRIMEReact UI框架拥有80多个React UI组件,质量一流,能够帮助您以时尚的方式实现所有UI需求。
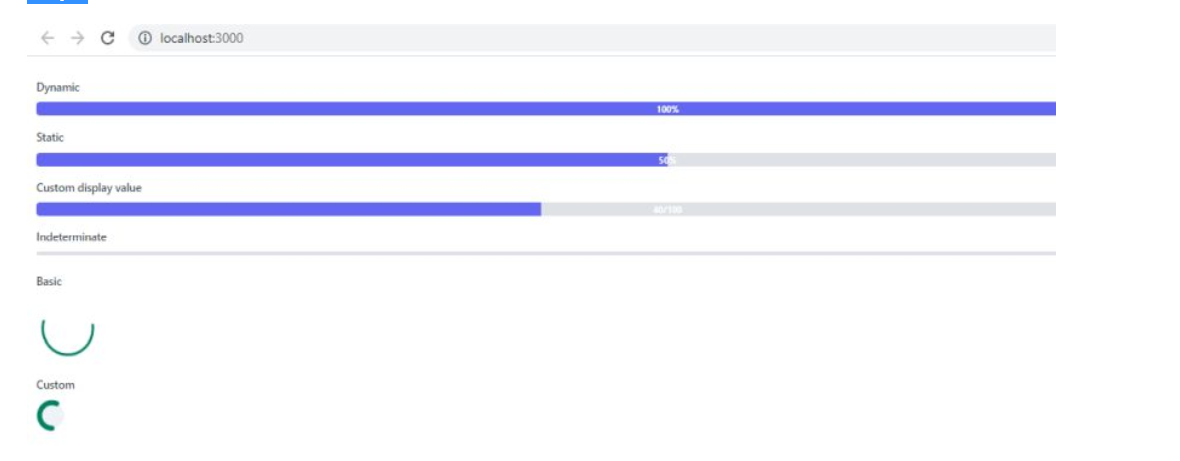
PrimeReact组件可以轻松地与ProgressBar和ProgressSpinner一起使用/集成。在这个例子中,使用ProgressBar和ProgressSpinner模拟了一个注册面板。
前提条件
- Javascript
- ReactJS的基本知识
- Node.js
- V.S. Code,Visual Studio
我们将涵盖以下内容,
- 创建React应用程序
- 安装Primeface
- 在ReactJS中使用ProgressBar和ProgressSpinner
步骤1
运行以下命令以创建ReactJS:
npx create-react-app prime-app
cd prime-app
npm start
步骤2
运行以下命令以安装PrimeReact:
npm install primereact primeicons
根据下面的图片创建文件:
文件步骤3
在App.js中添加以下代码:
import React, { useState, useEffect, useRef } from 'react';
import { ProgressBar } from 'primereact/progressbar';
import { Toast } from 'primereact/toast';
import { ProgressSpinner } from 'primereact/progressspinner';

function App() {
    const [value1, setValue1] = useState(0);
    const toast = useRef(null);
    const interval = useRef(null);
    const displayValueTemplate = (value) => {
        return (
            <React.Fragment>
                {value}/<b>100</b>
            </React.Fragment>
        );
    }
    useEffect(() => {
        let val = value1;
        interval.current = setInterval(() => {
            val += Math.floor(Math.random() * 10) + 1;
            if (val >= 100) {
                val = 100;
                toast.current.show({ severity: 'info', summary: 'Success', detail: 'Process Completed' });
                clearInterval(interval.current);
            }
            setValue1(val);
        }, 2000);

        return () => {
            if (interval.current) {
                clearInterval(interval.current);
                interval.current = null;
            }
        }
    }, []); // eslint-disable-line react-hooks/exhaustive-deps

    return (
        <div>
            <Toast ref={toast}></Toast>
            <div className="card">
                <h5>Dynamic</h5>
                <ProgressBar value={value1}></ProgressBar>
                <h5>Static</h5>
                <ProgressBar value={50}></ProgressBar>
                <h5>Custom display value</h5>
                <ProgressBar value={40} displayValueTemplate={displayValueTemplate}></ProgressBar>
                <h5>Indeterminate</h5>
                <ProgressBar mode="indeterminate" style={{ height: '6px' }}></ProgressBar>
            </div>
            <div>
            <div className="card">
                <h5>Basic</h5>
                <ProgressSpinner />
                <h5>Custom</h5>
                <ProgressSpinner style={{width: '50px', height: '50px'}} strokeWidth="8" fill="var(--surface-ground)" animationDuration=".5s"/>
            </div>
        </div>
        </div>
    );
}
export default App;
步骤4
在index.html中添加以下代码:
<!DOCTYPE html>
<html lang="en">
  <head>
    <meta charset="utf-8" />
    <link rel="icon" href="%PUBLIC_URL%/favicon.ico" />
    <meta name="viewport" content="width=device-width, initial-scale=1" />
    <meta name="theme-color" content="#000000" />
    <meta
      name="description"
      content="Web site created using create-react-app"
    />
    <link rel="apple-touch-icon" href="%PUBLIC_URL%/logo192.png" />

    <!-- PrimeReact -->
    <link rel="stylesheet" href="https://unpkg.com/primeicons/primeicons.css" />
    <link rel="stylesheet" href="https://unpkg.com/primereact/resources/themes/lara-light-indigo/theme.css" />
    <link rel="stylesheet" href="https://unpkg.com/primereact/resources/primereact.min.css" />
    <link rel="stylesheet" href="https://unpkg.com/primeflex@3.1.2/primeflex.min.css" />

    <!-- Dependencies -->
    <script src="https://unpkg.com/react/umd/react.production.min.js"></script>
    <script src="https://unpkg.com/react-dom/umd/react-dom.production.min.js"></script>
    <script src="https://unpkg.com/@babel/standalone/babel.min.js"></script>
    <script src="https://unpkg.com/react-transition-group@4.4.2/dist/react-transition-group.js"></script>

    <!-- Demo -->
    <script src="https://unpkg.com/primereact/core/core.min.js"></script>
    <script src="https://unpkg.com/primereact/splitter/splitter.min.js"></script>
    <!--
      manifest.json provides metadata used when your web app is installed on a
      user's mobile device or desktop. See https://developers.google.com/web/fundamentals/web-app-manifest/
    -->
    <link rel="manifest" href="%PUBLIC_URL%/manifest.json" />

    <!--
      Notice the use of %PUBLIC_URL% in the tags above.
      It will be replaced with the URL of the `public` folder during the build.
      Only files inside the `public` folder can be referenced from the HTML.

      Unlike "/favicon.ico" or "favicon.ico", "%PUBLIC_URL%/favicon.ico" will
      work correctly both with client-side routing and a non-root public URL.
      Learn how to configure a non-root public URL by running `npm run build`.
    -->
    <title>React App</title>
  </head>
  <body>
    <noscript>You need to enable JavaScript to run this app.</noscript>
    <div id="root"></div>
    <!--
      This HTML file is a template.
      If you open it directly in the browser, you will see an empty page.

      You can add webfonts, meta tags, or analytics to this file.
      The build step will place the bundled scripts into the <body> tag.

      To begin the development, run `npm start` or `yarn start`.
      To create a production bundle, use `npm run build` or `yarn build`.
    -->
  </body>
</html>
步骤5
在App.css中添加以下代码:
.App {
  text-align: center;
}

.App-logo {
  height: 40vmin;
  pointer-events: none;
}

@media (prefers-reduced-motion: no-preference) {
  .App-logo {
    animation: App-logo-spin infinite 20s linear;
  }
}

.App-header {
  background-color: #282c34;
  min-height: 100vh;
  display: flex;
  flex-direction: column;
  align-items: center;
  justify-content: center;
  font-size: calc(10px + 2vmin);
  color: white;
}

.App-link {
  color: #61dafb;
}

@keyframes App-logo-spin {
  from {
    transform: rotate(0deg);
  }
  to {
    transform: rotate(360deg);
  }
}
步骤6
在contires.json中添加以下代码:
[{
    "name": "Afghanistan",
    "code": "AF"
}, {
    "name": "Åland Islands",
    "code": "AX"
}, {
    "name": "Albania",
    "code": "AL"
},
...
{
    "name": "Zambia",
    "code": "ZM"
}, {
    "name": "Zimbabwe",
    "code": "ZW"
}]
步骤7
在package.json中添加以下代码:
{
  "name": "prime-demo",
  "version": "0.1.0",
  "private": true,
  "dependencies": {
    "@testing-library/jest-dom": "^5.16.4",
    "@testing-library/react": "^13.3.0",
    "@testing-library/user-event": "^13.5.0",
    "primeicons": "^5.0.0",
    "primereact": "^8.1.1",
    "react": "^18.1.0",
    "react-dom": "^18.1.0",
    "react-redux": "^8.0.2",
    "react-scripts": "^2.1.3",
    "redux": "^4.2.0",
    "web-vitals": "^2.1.4",
    "primeflex": "^3.1.0",
    "react-transition-group": "^4.4.1"
  },
  "scripts": {
    "start": "react-scripts start",
    "build": "react-scripts build",
    "test": "react-scripts test",
    "eject": "react-scripts eject"
  },
  "eslintConfig": {
    "extends": [
      "react-app",
      "react-app/jest"
    ]
  },
  "browserslist": {
    "production": [
      ">0.2%",
      "not dead",
      "not op_mini all"
    ],
    "development": [
      "last 1 chrome version",
      "last 1 firefox version",
      "last 1 safari version"
    ]
  }
}
步骤8
运行以下命令:
npm i
npm start
步骤9
总结
在本文中,我们学习了如何创建一个React项目,设置Prime React UI,并创建React Js进度条、进度旋转器和Prime React UI组件。
文章版权声明:除非注明,否则均为猿易帮原创文章,转载或复制请以超链接形式并注明出处。


还没有评论,来说两句吧...